Configuring a Canon camera as a webcam in Ubuntu
08 Aug 2023In recent weeks, I found myself facing a common challenge: transforming my Canon M50 into a functional webcam on Ubuntu. While Canon offers a straightforward solution, the EOS Webcam Utility for Windows users, Ubuntu lacks native support. Fear not, for alternatives do exist. In this guide, I’ll delve into the process of utilizing your Canon camera as a webcam.
Hardware needed
First, you will need any Canon camera, plus a micro-USB cable. The battery of your camera may drain very fast, so it’s also nice to have a dummy battery. I’m using this model from Aliexpress, but there are other options, like some ones plugged directly into the power socket. The dummy battery may be different depending on your camera model, so make sure to check it before buying.
Camera configurations
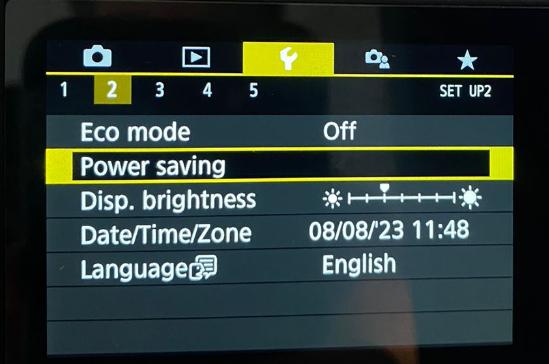
Begin by disabling the Eco mode on your Canon M50. This precaution prevents the camera from automatically powering off during use. On Canon M50, go to the wrench option, then you will find the Eco mode option on the second page. Switch it to Off.

Installng dependencies
These are the needed packages:
sudo apt-get install gphoto2 v4l2loopback-utils v4l2loopback-dkms ffmpeg build-essential libelf-dev linux-headers-$(uname -r) unzip vlcCreate a script file
I find it more useful and less error-prone to have the commands needed to start the camera on a script file. So, create a file called start-canon.sh with the following content:
sudo rmmod v4l2loopback # remove the module if it's already loaded
sudo modprobe v4l2loopback exclusive_caps=1 max_buffers=2 card_label="Canon M50" # load the module with the needed parameters
sudo pkill -9 gphoto # kill any gphoto process that may be running
gphoto2 --stdout --capture-movie | ffmpeg -i - -vcodec rawvideo -af "hqdn3d" -pix_fmt yuv420p -threads 0 -s:v 1920x1080 -f v4l2 /dev/video2 # start the camera
You may need to change the resolution of the video, under the -s:v parameter. You can also change the device name, if you want, in card_label parameter.
I have also applied a filter to the video, to reduce the noise. You can remove it if you want. The filter is applied with the -af parameter.
Since I’m using a laptop, the camera is mounted in /dev/video2. If you are using a desktop, it may be mounted in /dev/video0 or /dev/video1. You can check the device name with the command v4l2-ctl --list-devices.
Then, plug the camera on the USB port, change the camera to video mode, and run the script:
chmod +x start-canon.sh
./start-canon.sh
Using the camera as a webcam
Now, you can use the camera as a webcam. You can use it in Zoom, Google Meet, or any other software that uses the webcam. You can also use it in VLC, by opening the device as listed on the gphoto2 command.
